
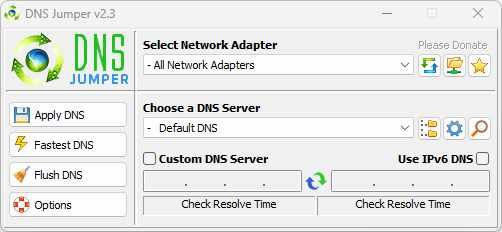
DNS, or domain name system, is the internet protocol that turns human readable website names into machine readable numeric addresses. In some cases, you can improve browsing speed and/or improve your security by replacing the DNS provided by your internet service provider. DNS Jumper is a tool which makes this easy for you.
| File Name | DNSjumper.zip |
| Version | 2.3 |
| Size | 625 Kb |
| Developer | sordum.org |
| Last Update | June 09, 2025 |
DNS Jumper is a software tool designed to help users easily change their Domain Name System (DNS) settings. The primary purpose of changing DNS settings is to improve internet connection speed, enhance security, or bypass internet restrictions set by internet service providers (ISPs) or governments.
What is DNS?
Before diving into DNS Jumper, it’s essential to understand what DNS is. DNS stands for Domain Name System, which is essentially the phonebook of the internet. When you type a web address (like www.example.com) into your browser, DNS servers translate that domain name into an IP address that computers use to identify each other on the network. Your internet speed and security can significantly depend on which DNS server your device is using.
Features of DNS Jumper
- Quickly and easily change your IPv4 and IPv6 DNS settings
- See your selected network card’s current DNS IP address.
- Easily backup and restore your current DNS settings.
- Check your DNS server response time.
- Automated checking of all listed DNS response times, finding the fastest available. You can then quickly apply it to your DNS settings.
- Add your own custom DNS server.
- CMD (command line) support
- Clear/Flush the DNS cache
- Add your own language (Use Options > Languages > Translate feature)
Use Cases
- Improving Internet Speed: Users experiencing slow internet speeds can use DNS Jumper to switch to a faster DNS server.
- Bypassing Censorship: In regions where the internet is heavily censored, DNS Jumper can help access blocked content by using DNS servers that bypass these restrictions.
- Enhancing Online Security: Users concerned about online security can switch to DNS servers that provide additional security features, protecting against online threats.
- Parental Controls: Some DNS servers offer parental control features, blocking access to inappropriate content. DNS Jumper makes it easy to switch to these servers.
- Testing for the Best DNS: For users who want to optimize their internet experience, DNS Jumper’s testing feature allows them to compare various DNS servers to find the best one for their specific needs.
DNS Jumper is a versatile tool that can enhance your internet browsing experience by providing a straightforward way to switch between different DNS servers based on your specific needs, whether for speed, security, or bypassing restrictions.
How to check current DNS on DNS Jumper?
To check your current DNS settings using DNS Jumper, follow these steps. The process is straightforward and allows you to see which DNS servers your system is currently using:
- Open DNS Jumper: First, launch the DNS Jumper application. If you haven’t already downloaded it, you’ll need to do so from our website and run the executable file.
- Click on ‘Current DNS Server’: If there’s a button or link labeled something like “Current DNS Server,” “Show Current DNS,” or “DNS Server,” click on it. This action prompts DNS Jumper to retrieve and display the DNS server(s) your system is currently using.
- View the Information: After clicking the relevant option, DNS Jumper will display the IP addresses of the current DNS servers. There might be primary and secondary DNS server addresses shown, reflecting the DNS servers your internet connection is using at the moment.
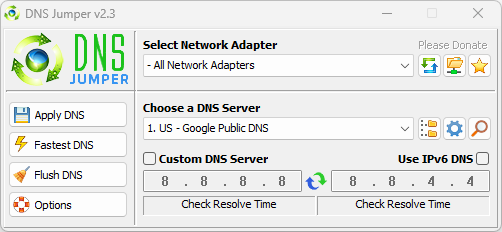
If you are looking to change your DNS settings using DNS Jumper, the application also provides an easy way to do so, with a list of well-known DNS providers to choose from or the option to enter custom DNS server addresses manually.
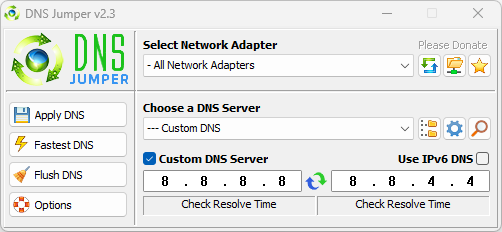
How To Add a Custom DNS Server?
Easily add a custom DNS server by first ticking the ‘Custom DNS server’ box, and then type (or paste) in the IP address you wish to add. Do the same for the alternate IP address. Then click the ‘Apply DNS’ button.
- Under ‘choose a DNS Server’, select a server from the drop-down menu.

- Click the ‘Apply DNS’ button
How to find Information About the Preferred and Alternate DNS?
The “magnifying glass” button on the far right of the main window opens a menu that allows you to get information about your current DNS server, or to copy the IP numbers to the clipboard.
How to Backup or Restore DNS Settings?
The first time you run DNS Jumper, it automatically backs up your current network card’s DNS settings. To back up the settings manually, click “Quick Configuration” (the ‘star’ button) and then select ‘Backup DNS’.
There are two ways to restore your settings back to your ISP’s defaults.
1. click the “Quick Configuration” button (the star) and click “Default DNS”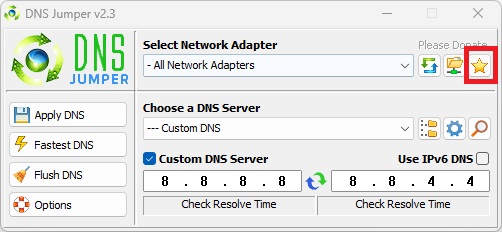
2. Under “Choose a DNS Server”, open the drop down menu and select “Restore” or “Default”, and then click the “Apply DNS” button
Note: For IPv6, tick the IPv6 checkbox
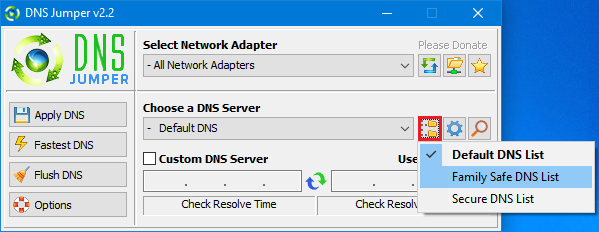
How to Choose a Dns Group?
DNS Jumper features 3 pre-set lists of servers to choose from. Aside from the Default list, you might also wish to see a list of Family Safe servers. These can help protect your children from inappropriate websites (including pornographic). You can improve security by selecting the ‘Secure DNS List’.
How to find fastest DNS?
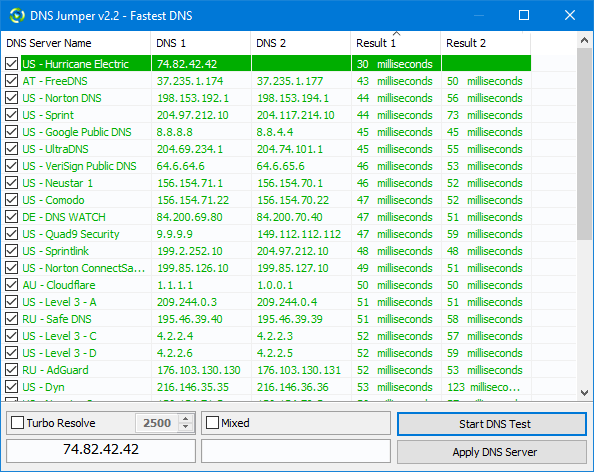
1. Click the “Fastest DNS” button
2. Click the “Start DNS Test” button
DNS Jumper will find the fastest DNS IPs and mark them (green) and will automatically sort the IPs based on speed.
3. The fastest DNS server will be auto-selected and you can click “Apply DNS Server” in the bottom right of the window to apply it. Right click any DNS entry to see a context menu which offers options to Apply DNS, mark or unmark all DNS, get information on the selected DNS, or use the DNS Group feature.
If you have a long list of DNS servers and want to find the resolve times, you can use the Turbo Resolve feature. It will drastically reduce the total test time.
Note: The Fastest DNS feature only works for IPv4
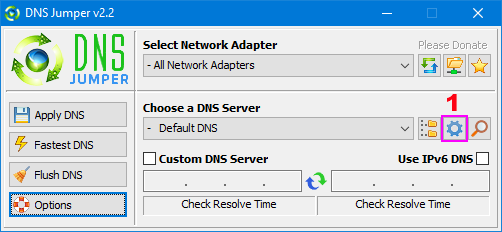
How to add or delete a DNS or DNS group ?
Add or delete a DNS server: Click the “DNS Options” button (gear icon) (1)
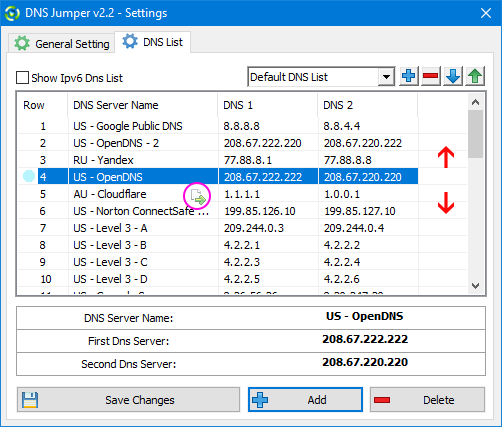
The settings page will open to the DNS List tab. You can now edit the default DNS server list, or choose another from the drop-down list (1). From here you can add or delete a server from the list, change its name, or its IP address. When making changes you will need to click the “Save Changes” button to apply them.
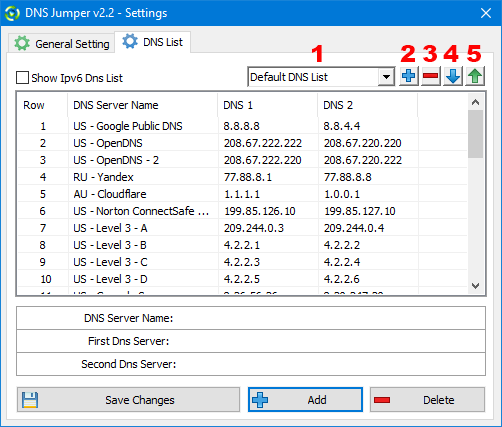
Add or delete a DNS server Group: There are two methods for adding or deleting a group.
a) via the user interface : Click the Add (blue plus sign) button (2) and type in a name for your group. This will open a new blank DNS server list, to which you can manually add your own servers. You can delete a group by using the Delete (red minus sign) button (3)
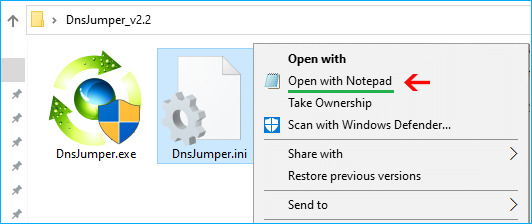
b) via the DNSJumper.ini: To avoid problems, close DNS Jumper before editing the .ini. Right-click the dnsjumper.ini file and select “open with Notepad”.
and Add your new IPv4 or IPv6 group
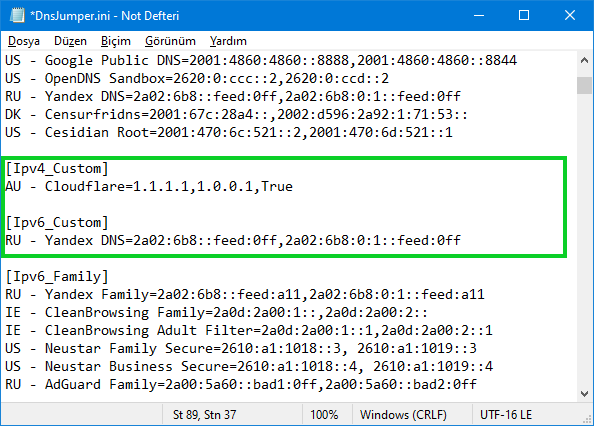
1. Ipv4 or IPv6
2. Group Name
3. Location
4. DNS Name
5. Preffered DNS
6. Alternate DNS
7. True=included in fastest DNS test, false=not included in the test
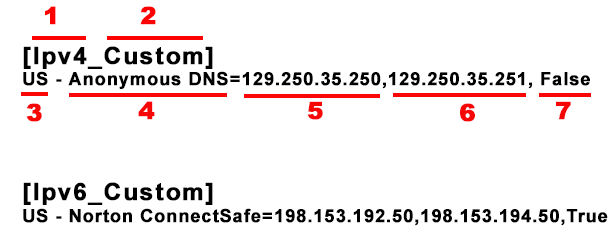
To delete a DNS group, select it and delete it. The same goes for IPv6.
How to changing Dns list order?
You can easily reorder your DNS Server list with drag and drop. As shown in the screenshot above, to move “US-OpenDNS-2” down the list, left click it and drag it to its new position and release.
Start DNS jumper on system startup
To have DNS Jumper auto-start with Windows, Click the “DNS Options” button (blue gear) then select the “General Settings” tab. Near the bottom, tick the box next to “Start DNS Jumper on system startup”
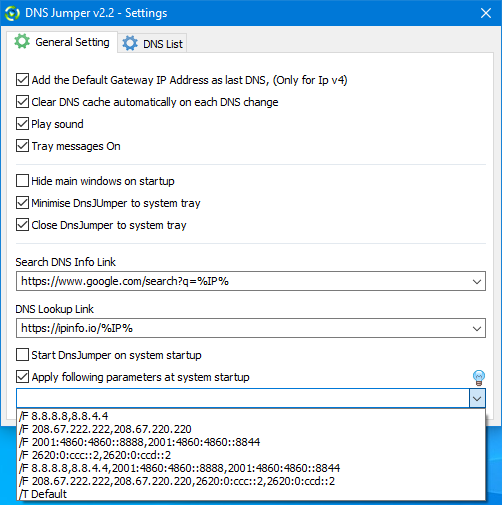
Run fastest Dns test at startup and apply it Automatically
In the same General Settings area, tick the box next to “Apply following parameters at system startup”, and in the text field below that type in “/T default” (without quotes). You can also apply other settings at startup using the correct parameters. Click the light bulb icon to the far right for more information regarding parameters.
Dns Jumper’s Cmd parameters
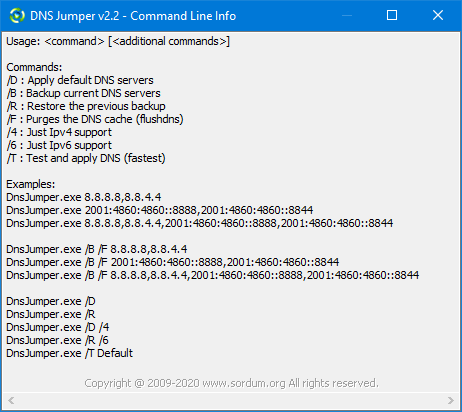
In a command prompt, running “dnsjumper.exe /?” (no quotes) will list all available parameters. See also the screenshot above.